Introduction:
Using their web browser, a customer opens a web page that has webchat available. The web browser acts as the “web client”.
Starting a chat:
The customer clicks on the chat button:

This opens a chat box.
The name of the service being accessed is shown at the top of the chat box. For example:

Note: If required, a company administrator can configure the following in the webchat snippet (Chat > Chat Services > Webchat Snippet):
- The colour of the chat button
- The time delay before the chat box appears automatically to the customer
- The name of the service that is shown at the top of the chat box.
Connecting:
A connection is made to a chat flow in the Contact.
The chat flow might do one of the following:
- Send an initial message to the customer’s chat box (as configured in the Send Chat Message node in Flow Editor)
- Connect the webchat to a chat queue (as configured in the Queue Chat node in Flow Editor).
Issues:
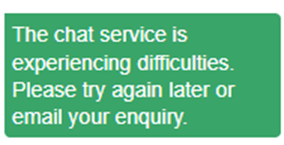
The message below may display to a webchat ‘caller’:

This may be due to the web code not containing the correct IDs matched against the chat service config.
Typing a message:
The customer can type their message in the chat box. The customer types in their messages in the lower section of the chat box:

To add emoticons to a message, the customer can click:

and then select (or search for) specific emoticons. For example:

Clicking on an emoticon in the central panel adds that emoticon to the message being composed at the current position. Skin tones for hands and faces may be selected from the lower tool bar.
To send a message, the customer can either press Enter or click:

Connecting to an agent:
When an agent becomes available, the webchat is allocated to the agent. The agent makes the webchat active and can then talk to the customer.
The middle section of the chat box shows the history of the webchat as it progresses. For example:

Messages from the chat flow or an agent are displayed on the left. Messages sent by the customer (web client) are displayed on the right. The time that the message was sent is displayed underneath the message.
Saving chats:
Either during the webchat or at the end of it (but before the chat box is closed), the customer can save the conversation to a local file (in .txt format) by clicking:

and then selecting Save chat to file:

This saves a copy of the webchat up to this point in a file on the customer’s computer. A dialog appears asking where the webchat should be saved to. The appearance of this dialog depends on the web browser used. The file will then be available in the downloads as usual. For example:

The following is an example of a saved chat file:

Closing a chat:
At the end of the conversation, the customer can close the chat box by clicking:

and then selecting Close this chat box:

Alternatively, they may turn their web browser off.
Wrapup:
The agent is then placed in the wrapup period.
