This guide provides a tutorial that describes how to create a very simple routing flow. In this instance, the call flow plays an announcement to the caller requesting a DTMF keypress and then queues the incoming call for a customer-service agent. It uses the standard Two-Option Menu and Emergency Announcement call flow provided with the system as a worked example. The objective here is to familiarise you with the basic steps involved in creating a routing flow.
Constructing a routing flow in the Flow Editor involves placing nodes, configuring them and connecting paths between them.
Note: You must have the Call Flows: Modify privilege and access to the Flow Editor to create a call flow.
Step by step tutorial #
1 – Create a Call Flow
Start by creating a new call flow:
- Navigate to Call Handling → Call Flows
- Click Add and the new flow page is displayed
- (Mandatory) Enter the name of the new flow
- For the purposes of this tutorial, enter the name Worked Example.
- Enter a brief description if required
- Click Add
- The call flow will be created
- A Call flow has not been defined message is displayed on the call flow details page.
To view the flow click the flow editor icon:

2 – Select the node types
Make the relevant node types available to be used in the flow:
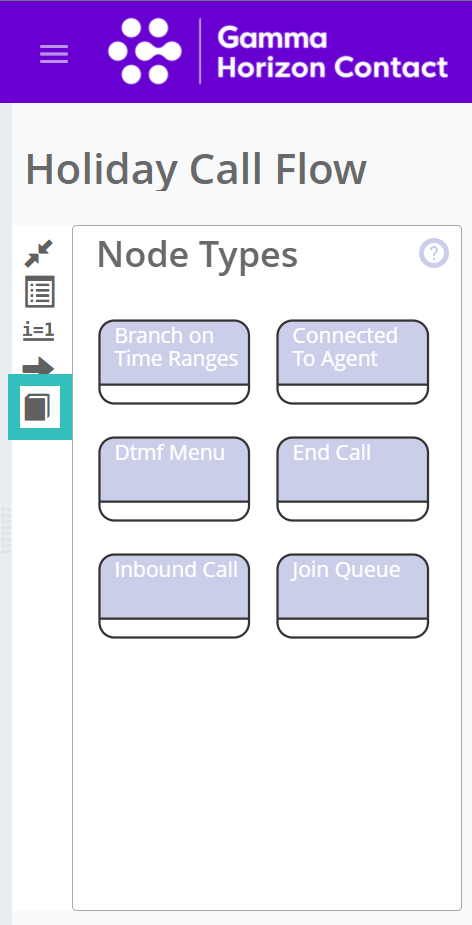
- In the flow editor click the Node type library icon

- Select the following node types:
- Check Option
- Connected To Agent
- DTMF Menu
- End Call
- Inbound Call
- Join Queue
- Play Announcement
- Click OK
- The nodes will be added to the node library ready to be used in the flow
3 – Add the nodes
Place the nodes into the call flow workspace area:
- Drag an Inbound Call node into the workspace area
- Drag a Check Option node into the workspace area
- Drag a Play Announcement node into the workspace area
- Drag a DTMF Menu node into the workspace area
- Drag a Join Queue node into the workspace area
- Drag another Join Queue node into the workspace area
- Drag a Connected To Agent node into the workspace area
- Drag an End Call node into the workspace area
4 – Configure the Inbound Call node
Configure the parameters for the Inbound Call node:
- Click on Inbound Call to display the parameters pane for this node
- Click the plus icon (+) for Options
- Click the plus icon (+) for Inbound call
- Select the dropdown list and click Add variable…
- Enter Inbound Call as the variable name
- Click OK
The parameters pane for Inbound Call should look as follows:

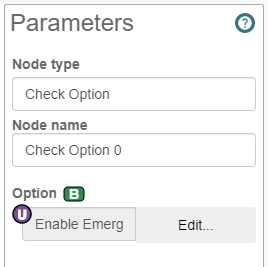
5 – Configure the Check Option node
Configure the parameters for the Check Option node
- Click on Check Options to display the parameters pane for this node
- For Option, click the L symbol and select user-configurable
- This allows a Contact administrator with the Service Numbers: Modify privilege to enable or disable any options that you set up for this node to suit their requirements.
- The On and Off branches of this node type denote the ability to enable or disable this functionality.
- Click Edit to open the Edit Parameter Option dialog
- For Section, type in options
- This will be the title of the section under which the user-configurable parameters for this call flow will be displayed to a Contact administrator.
- For Name, type in Enable Emergency Announcement
- For Description, type in If Contact is having technical difficulties, play an announcement
- Click OK
The Parameters pane for the Check Option node will look as follows:
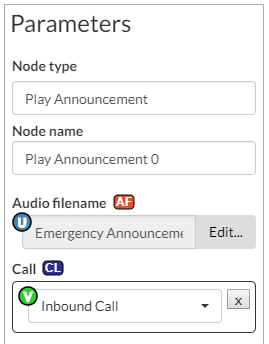
6 – Configure the Play Announcement node
Configure the parameters for the Play Announcement node:
- Click on Play Announcement to display the parameters pane for this node
- For Audio Filename, click the L symbol and select user-configurable
- This allows a company administrator with the Service Numbers: Modify privilege to specify a different audio file to be played to suit their requirements.
- Click Edit to open the Edit Parameter Option dialog
- For Section, type in Options
- This will be the title of the section under which the user-configurable parameters for this call flow will be displayed to a company administrator.
- For Name, type in Emergency Announcement Audio
- For Description, type in Play this announcement if the call centre is having technical difficulties.
- Tick the Required check box
- Click OK
- Click the Call selector
- Click Add variable
- Enter Inbound Call as the variable name
- Click OK
The Parameters pane for the Play Announcement node will look as follows:
7 – Configure the DTMF Menu node
Configure the parameters for the DTMF Menu node:
- Click on DTMF Menu to display the parameters pane for this node
- For Audio to play, click the L symbol and select user-configurable
- This allows a company administrator with the Service Numbers: Modify privilege to specify a different audio file to be played to suit their requirements.
- Click Edit to open the Edit Parameter Option dialog
- For Section, type in DTMF Menu
- This will be the title of the section under which the user-configurable parameters for this call flow will be displayed to a company administrator.
- For Name, type in Welcome Menu Audio
- For Description, type in Play this announcement to describe the available DTMF options
- Tick the Required check box
- Click OK
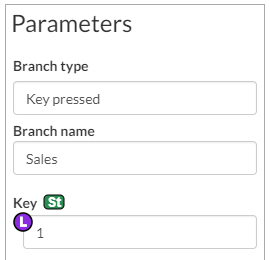
- Right-click the DTMF Menu node name in the call flow and select Add “Key pressed” branch. Configure the branch as follows:
- Left-click the branch name in the node in the call flow. The Parameters pane for this branch is displayed on the left side
- For Branch name, enter Sales
- For Key, enter 1
- Right-click the DTMF Menu node name in the call flow and select Add “Key pressed” branch. Configure the branch as follows:
- For Branch name, enter Billing
- For Key, enter 2
The Parameters pane for the branches will look as follows:

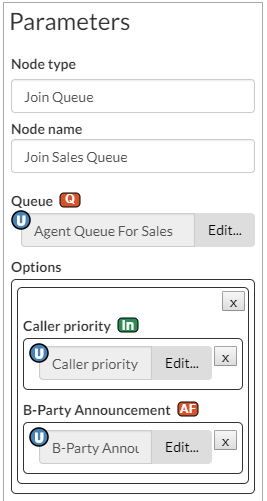
8 – Configure the Join Queue node
Configure the parameters for the Join Queue node:
- Click on Join Queue to display the parameters pane for this node
- For Node name, enter Join Sales Queue
- For Queue, click Edit to open the Edit Parameter Option dialog
- For Section, type in Queues
- This will be the title of the section under which the user-configurable parameters for this call flow will be displayed to a company administrator.
- For Name, type in Agent Queue for Sales
- For Description, type in Calls for the Sales team are queued here
- Tick the Required check box
- Click OK
- Click the Options selector
- Click the Caller Priority selector
- For Caller Priority, click the L symbol and select user-configurable
- This allows a company administrator with the Service Numbers: Modify privilege to specify a different caller priority to suit their requirements.
- Click Edit to open the Edit Parameter Option dialog
- For Section, type in Join Sales Queue.
- This will be the title of the section under which the user-configurable parameters for this call flow will be displayed to a company administrator
- For Name, type in Caller Priority
- For Description, type in Calls in the Sales queue are high priority..
- Tick the Required check box
- For Minimum Value, type in 1
- For Maximum Value, type in 1
- Click OK
- For Caller Priority, click the L symbol and select user-configurable
- Click the B-Party Announcement selector
- For B-Party Announcement, click the L symbol and select user-configurable
- his allows a company administrator with the Service Numbers: Modify privilege to specify a different audio file announcement to play to the agent when they answer the call.
- Click Edit to open the Edit Parameter Option dialog
- For Section, type in Join Sales Queue.
- For Name, type in B-Party Announcement
- For Description, type in Whisper to Sales agent.
- Tick the Required check box
- Click OK
- For B-Party Announcement, click the L symbol and select user-configurable
The Parameters pane for the Join Sales Queue node will look as follows:
Configure the second Join Queue node in the call flow, but this time configure the node as follows:
| Parameter | Value |
| Node name | Join Customer Services Queue |
| Queue | Agent Queue For Customer Services |
| Options/ Caller Priority – user-configurable | Section – Join Customer Services Queue Name – Caller Priority Description – Calls in the Customer Services queue are second highest priority. Required – ticked Minimum Value – 2 Maximum Value – 2 |
| Options/ B-Party Announcement – user-configurable | Section – Join Customer Services Queue Name – B-Party Announcement Description – Whisper to Customer Services agent. Required – ticked |
9 – Configure the Connected To Agent node
Configure the parameters for the Connected To Agent node:
- Click on Connected To Agent to display the parameters pane for this node
- Click the Hold Music selector
- Select Music
The Parameters pane for the Connected To Agent node will look as follows:

Note: You do not need to configure parameters for the End Call node.
10 – Connect the call flow
Connect the nodes using paths to create an order of execution:
- Drag from the Next branch of the Inbound Call node to the Check Option node.
- Drag from the On branch of the Check Option node to the Play Announcement node.
- Drag from the Off branch of the Check Option node to the DTMF Menu node.
- Drag from the Next branch of the Play Announcement node to the DTMF Menu node.
- Drag from the Sales branch of the DTMF Menu node to the Join Sales Queue node.
- Drag from the Billing branch of the DTMF Menu node to the Join Customer Services Queue node.
- Drag from the Other key pressed branch of the DTMF Menu node to the Join Customer Services Queue node.
- Drag from the Connected branch of the Join Sales Queue node to the Connected To Agent node.
- Drag from the DTMF branch of the Join Sales Queue node to the Connected To Agent node.
- Drag from the Limit Reached branch of the Join Sales Queue node to the End Call node.
- Drag from the Connected branch of the Join Customer Services Queue node to the Connected To Agent node.
- Drag from the DTMF branch of the Join Customer Services Queue node to the Connected To Agent node.
- Drag from the Limit Reached branch of the Join Customer Services Queue node to the End Call node

11 – Holiday Schedules
As the holiday season approaches you may need to amend your call flows to include specific days when a business is closed.
Our call flow should operate like this –

This is achieved via three sections – Holiday Lists, Time Ranges and Call Flows.
Step 1 – Holiday List
First we need to create a holiday list. This is done in the Holiday List section, under the Staff heading on the left.
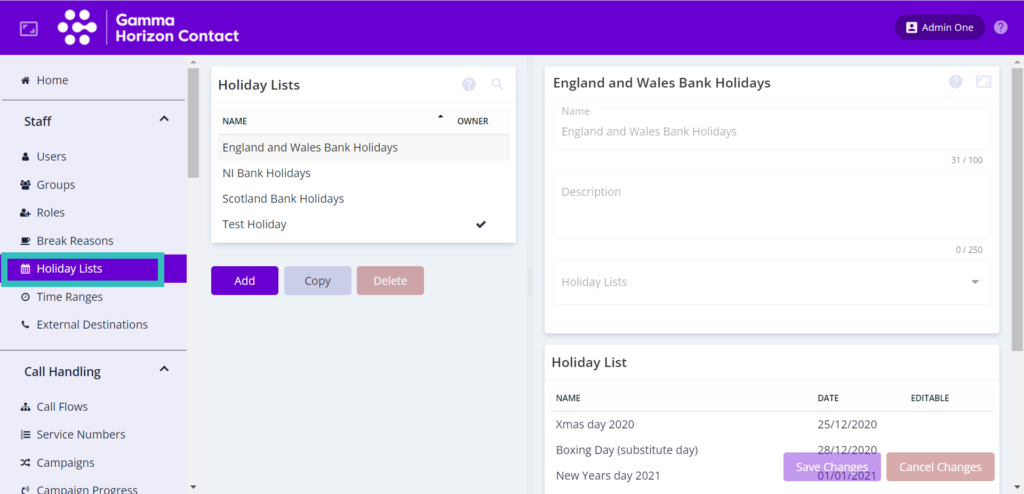
On this page you will see any holiday lists already created, including the default England/Wales Bank Holidays, Northern Ireland Holidays and Scotland Bank Holidays. If these have the appropriate days included then you can use them without modification.
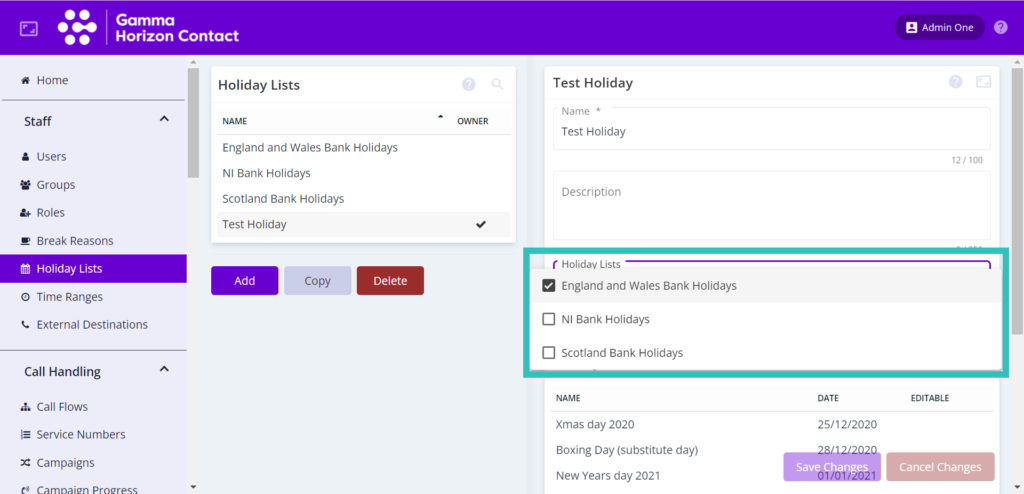
If you wish to add or remove any dates, click ‘Add’ to make a new holiday list. Give this list a name and description and add any of the default holiday lists (for example, England and Wales Bank Holidays) as a starting point if applicable.
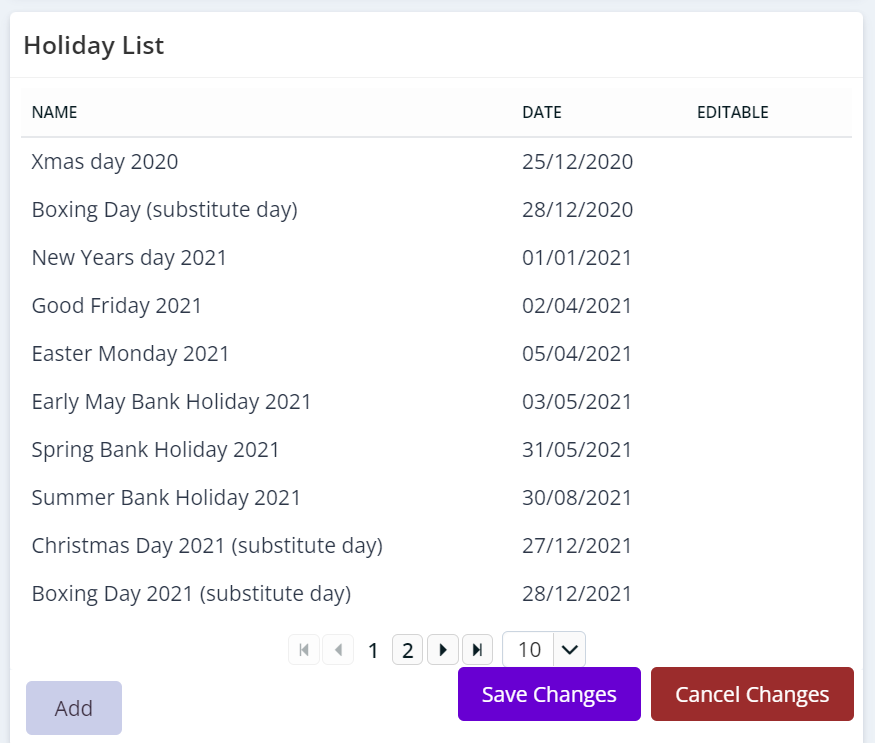
You can then add any specific dates as required using the Add button and then save your new holiday list with the Save Changes button.
Step 2 – Time Ranges
Now that we have created an appropriate holiday list, we can use this to control a time range. You may have already created a time range to control your call flow but we will create a new one just for the holiday dates.
First go to the Time Ranges section found under Staff, then click the Add button to create a new time range.

Name the time range and give it a description then ensure that the ‘Use holiday lists in time range configuration’ option is selected. Then choose the holiday list that you created or amended in the Step 1.
You will want to ensure the following time range rule is defined –
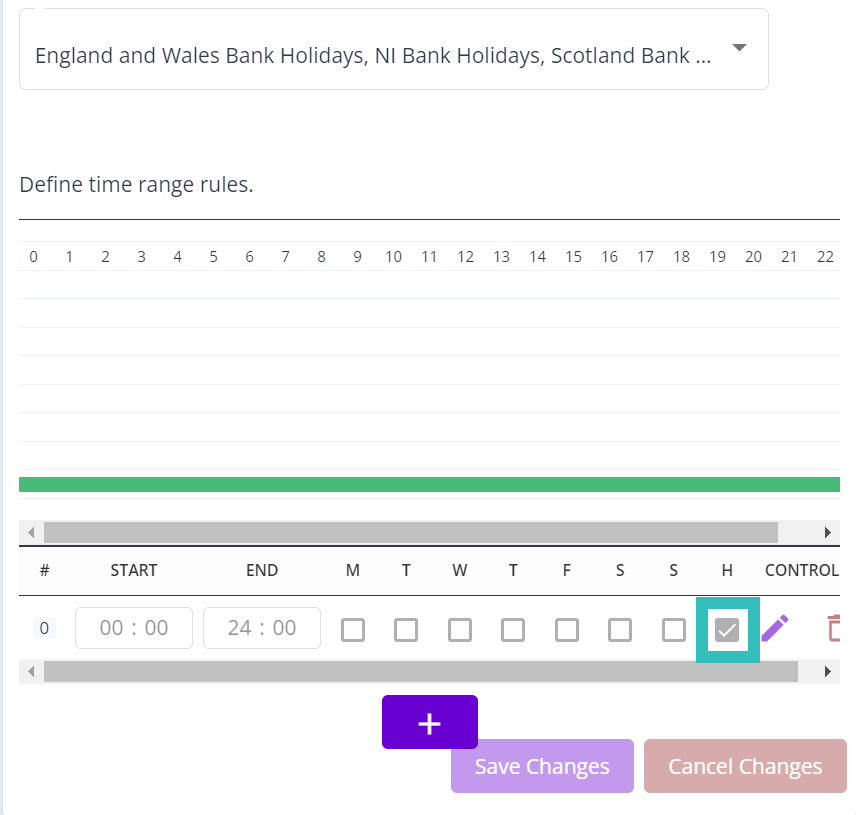
Add a rule by clicking the + button and then make sure the start time and end time is configured to cover the entire 24 hour period and that the H option is ticked. This time range will now use the holiday list we made earlier and, if a date matches a holiday, have it apply for the entire day. Please note that the H option is used in addition to any other days of the week selected here.
Step 3 – Call Flows
The final step is to amend our call flow/s to include this new time range and route our customers depending on whether the business is open or closed.
Go to the Call Flows section under Call Handling.
Choose the call flow you wish to amend.
You may already be using a Branch on Time Ranges node to control when the business is open or closed during the regular working week. If not, use the Node Type Library button on the left to add a Branch on Time Ranges node to your call flow. You can learn more about the Branch on Time Ranges node here.
You will want to add at least two Match branches if you are setting up the Branch on Time Ranges node for the first time. Rename the top Match branch to Holiday and the second to Open.
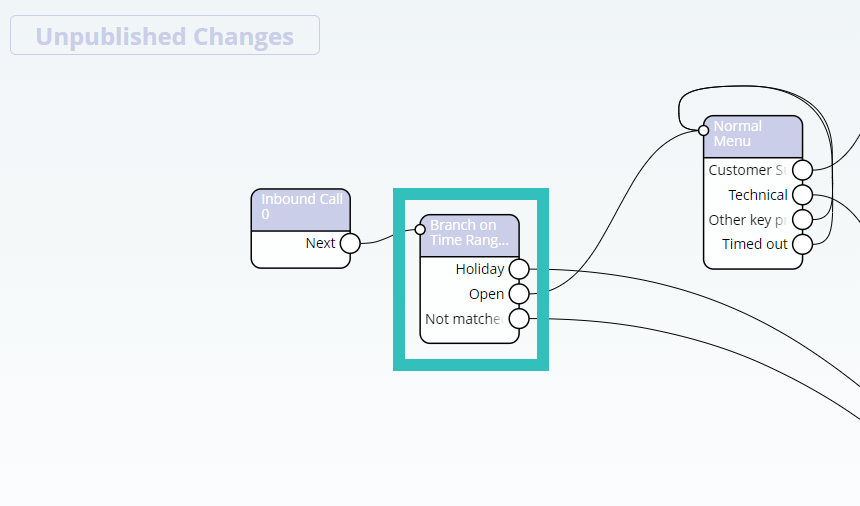
It is important to put the holiday branch first as Contact works through the Branch on Time Ranges node from top to bottom.
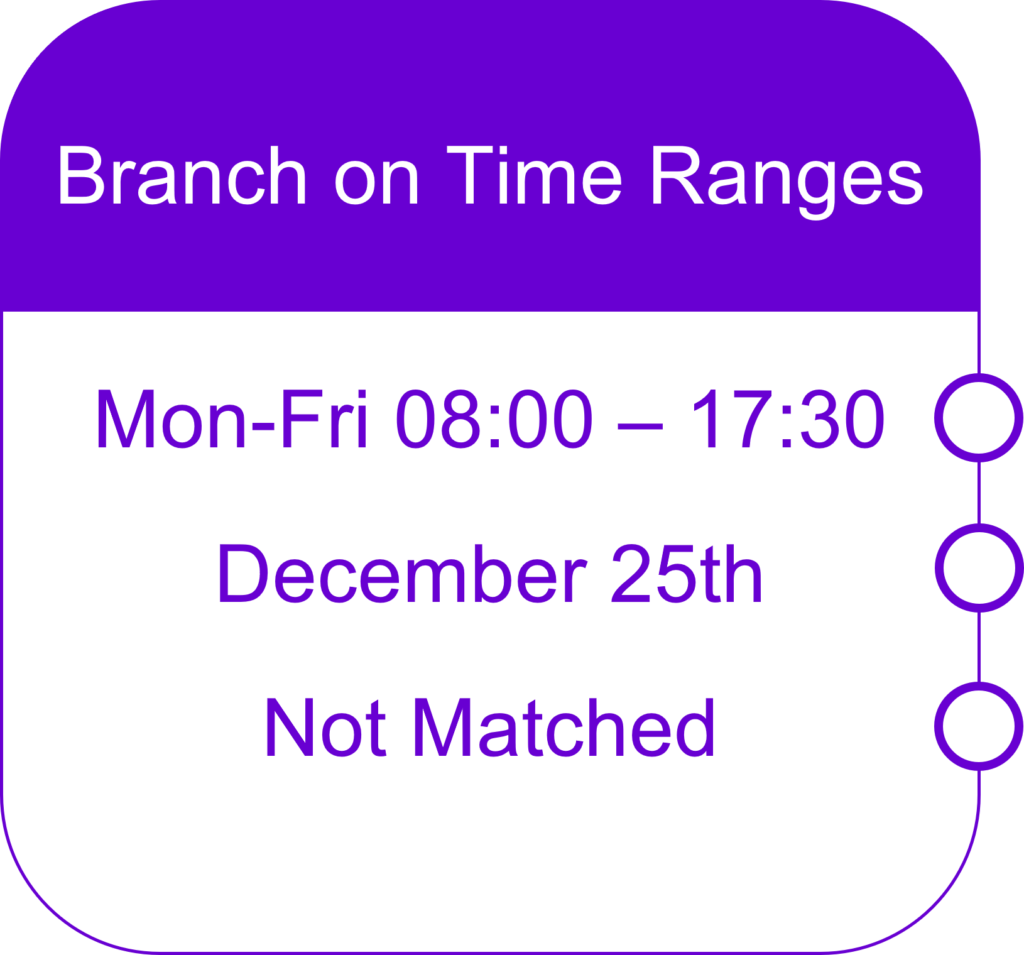
With the above example, December 25th may land on a weekday and so between business hours, Contact will send the call through the regular flow as it matches the time range inside that branch.

In this example, it does not matter what day of the week December 25th happens to be as on that date the call will be sent through the specific branch, to the a holiday announcement, voicemail etc. On any other date the calls will flow as expected.
Please note –
If you are already using a Branch on Time Ranges node in your Call Flow, you may want to add an additional Branch on Time Ranges node rather than edit your existing one.
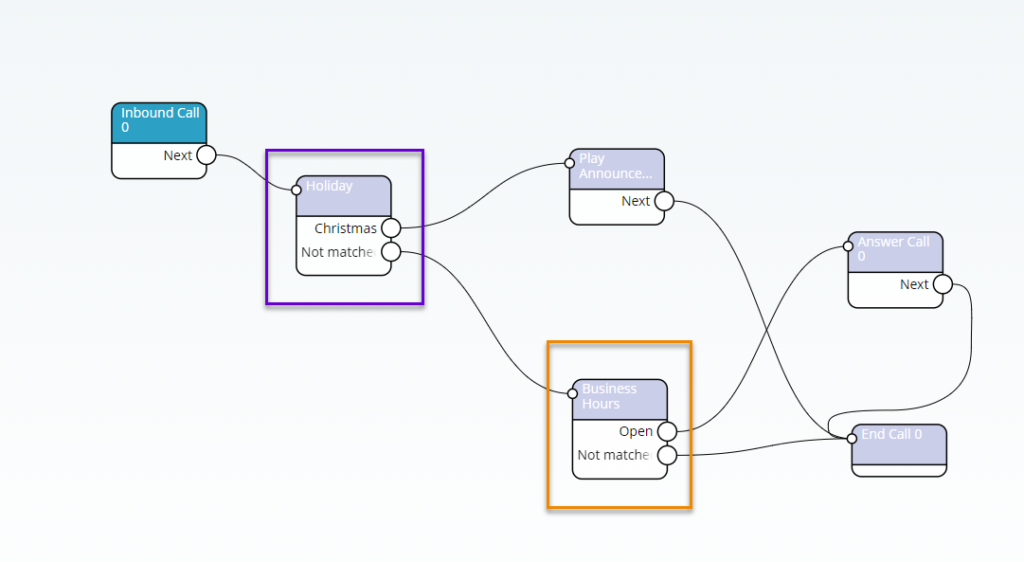
You are free to connect those branches as needed, for example you could connect the Holiday branch to a Play Announcement node to advise callers of the holiday opening hours, then to a Voice Mailbox node or perhaps an Route to External Number node for offsite support.
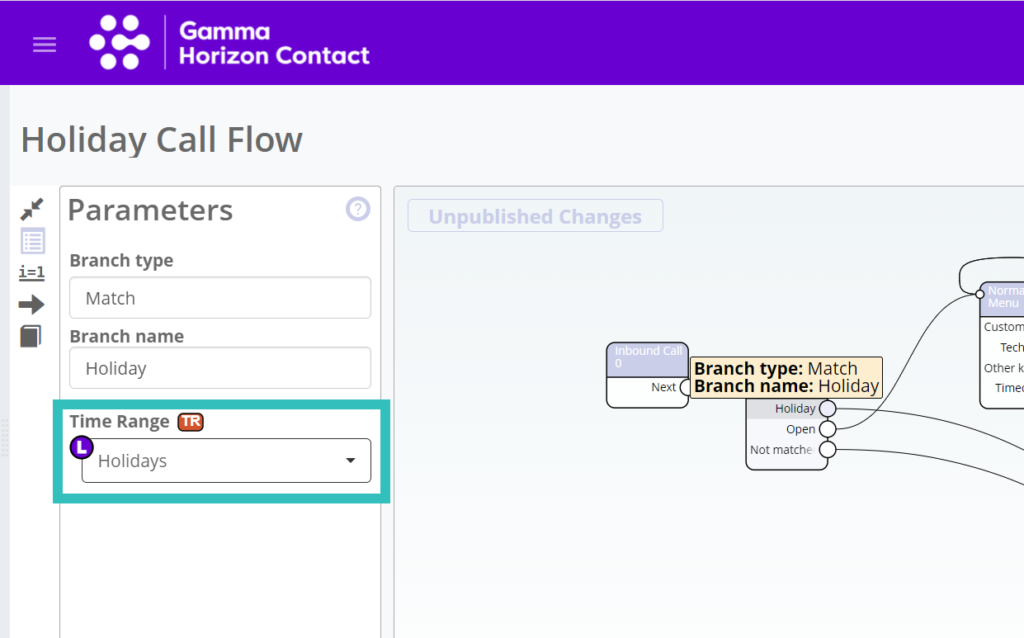
Once you have connected the Branch on Time Ranges node as required, click on the Holiday branch inside of that node to view the parameters. From there make sure to select the time range that you created earlier.
Contact will now route callers through your call flow as appropriate.
12 – Validate and publish the call flow
Validate the call flow and publish the completed call flow so that it can be assigned to service numbers and used by the system to handle calls.
- In the flow editor click the Validate and publish icon

- Review any errors and resolve if necessary
- Click Publish
- The flow will be published and ready to be assigned to a service
How the example call flow works #
- An inbound call arrives.
- If the option to play an emergency announcement is enabled (Check Option node:On branch), call flow proceeds to the Play Announcement node, the audio file is played to the caller and then call flow proceeds to the DTMF Menu node.If the option to play an emergency announcement is disabled (Check Option node:Off branch), call flow proceeds directly to the DTMF Menu node.
- An audio file for the DTMF menu is played. If the caller presses 1, the Sales branch is taken and the call flow proceeds to the Join Sales Queue node. If the caller presses 2 or any other key, the call flow proceeds to the Join Customer Services Queue node.
- For either queue:
- If the call is connected to an agent, call flow proceeds to the Connected To Agent node
- If the queue limit is reached, call flow proceeds to the End Call node
- If the caller presses a DTMF key to escape the queue, call flow proceeds to the Connected To Agent node.