Shared mailboxes are used when multiple people need access to the same mailbox, such as a company support email address. Users with permissions to the group mailbox can send as or send on behalf of the mailbox email address (if the mailbox administrator has given that user permissions to do so).
To support shared email accounts, the Microsoft Office 365 account and Contact email server connections must be configured accordingly. This can be done by a company administrator as follows:
Procedure #
Step 1:
Ensure that you (the company administrator) have access to the shared mailbox and that the shared address for the mailbox can be accessed via your own email address.
Note: Only Microsoft Outlook users with either a global administrator role or an Exchange administrator role can create and grant access to shared mailboxes. If you have either of these roles already, you can configure the settings yourself. If not, you will need to send a request to the mailbox administrator for permissions (membership) to use the shared mailbox.
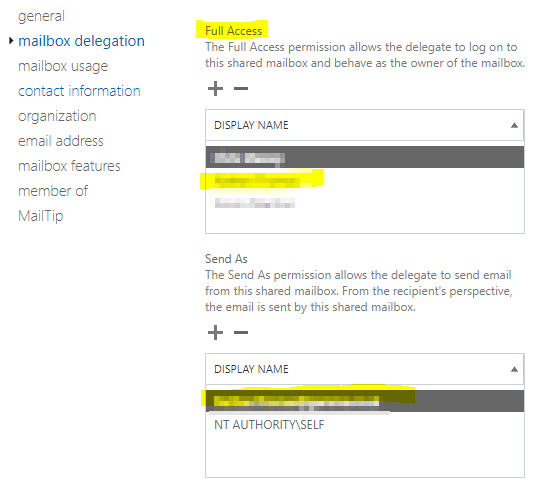
The following permissions should be set up for you on the mailbox delegation tab:
- Full Access – allows you to open the shared mailbox and act as the owner of that mailbox, so you can read, view, delete, and change email messages. However, you also require the Send As permission to send email from the shared mailbox.
- Send As – allows you to impersonate the shared mailbox when sending mail. For example, if you log into the shared mailbox named Marketing Department and send an email, it will look like the Marketing Department sent the email.

Step 2:
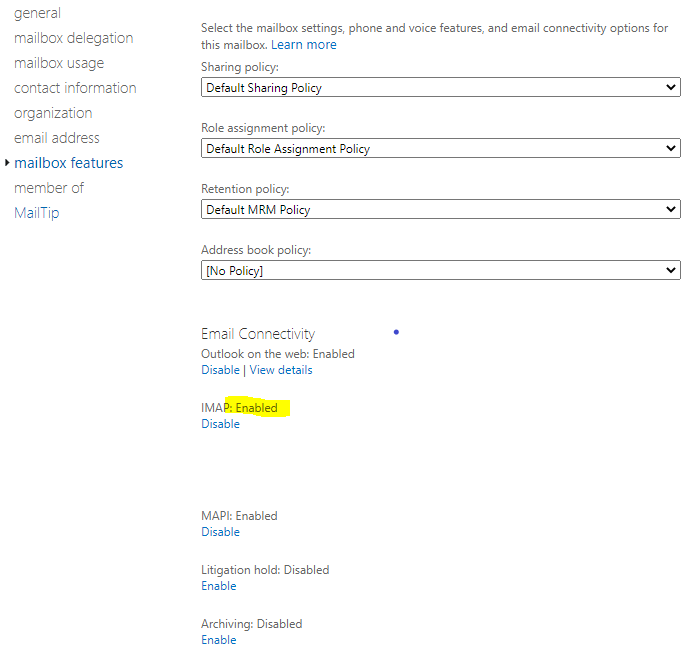
For both of the Display name accounts selected above, the email connectivity settings on the mailbox features tab should be configured as follows:
- Outlook on the web: Enabled – so that both accounts can be accessed via the Microsoft web pages
- IMAP: Enabled

Step 3:
Authorise the email connectivity settings in the consent configuration dialog.
Step 4:
In the Contact Administrator Portal, click Email > Email Servers on the menu bar. A list of the email servers that have been defined is displayed.Company administrators must have the Email Server Configuration: Modify privilege to manage email servers.
Step 5:
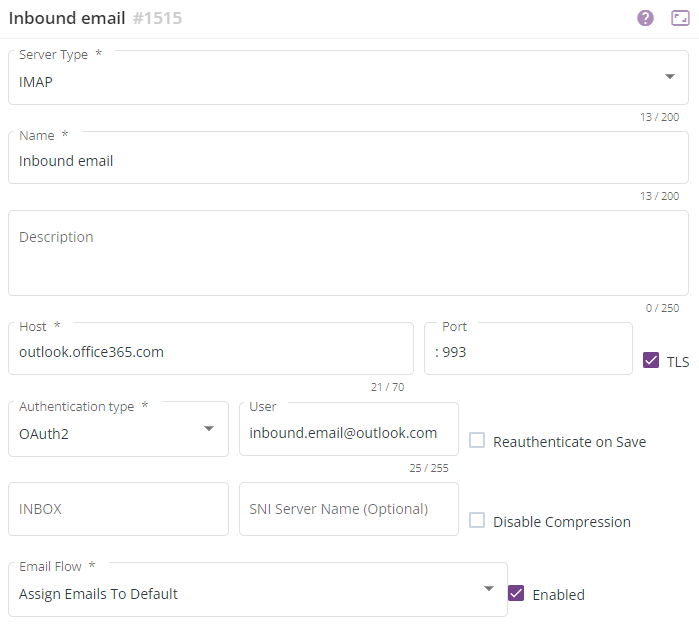
For inbound email, select the IMAP server and configure the settings as follows:

| Parameter | Value |
| Server Type | IMAP |
| Name | The name of the email server |
| Host | outlook.office365.com |
| Port | 993 |
| TLS | Enabled (ticked) |
| Authentication Type | 0AUTH2 |
| User | The username that is used to log in to the email account on the email server. This is usually an email address. |
| Email Flow | The email flow to associate with this email server. |
| Enabled | Ticked, to activate the connection to the email server. |
Step 6:
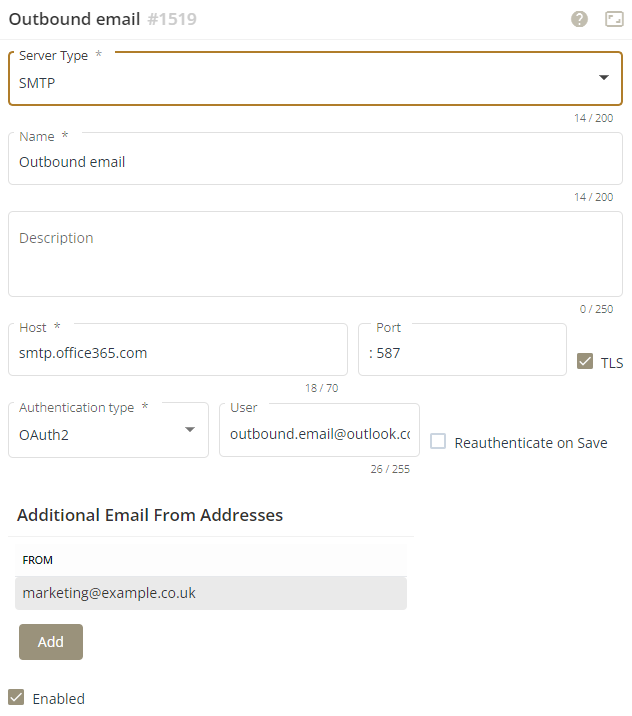
For outbound email, select the SMTP server and configure the settings as follows:

| Parameter | Value |
| Server Type | SMTP |
| Name | The name of the email server |
| Host | smtp.office365.com |
| Port | 587 |
| TLS | Enable (ticked) |
| Authentication Type | 0AUTH2 |
| User | The username that is used to log in to the email account on the email server. This is usually an email address. |
| Additional Email From Addresses | Additional email From addresses that an agent can select from a dropdown list when they need to send an email. Note: As a minimum, you must add the email address that you have specified as the User parameter for the IMAP email server (see previous table), which is the shared email address. Otherwise when an email is sent out, the personal email address (as configured for the User parameter for the SMTP email server), will be used. |
| Enabled | Ticked, to activate the connection to the email server. |
Shared email accounts should now be supported.
