This procedure describes how to configure the parameters for the Join Queue nodes.
Procedure #
Step 1:
Click the node name of the first Join Queue node in the call flow. The Parameters pane for this node is displayed on the left side.
Step 2:
For Node name, type in Join Sales Queue
Step 3:
For Queue, click Edit.
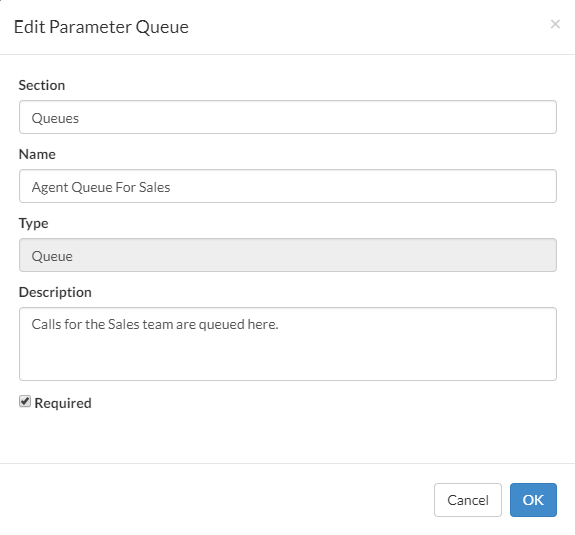
The Edit Parameter Queue dialog is displayed.
Step 4:
In the Edit Parameter Queue dialog:
a. For Section, type in Queues. This will be the title of the section under which the user-configurable parameters for this call flow will be displayed to a company administrator.
b. For Name, type in Agent Queue For Sales.
c. For Description, type in Calls for the Sales team are queued here.
d. Tick the Required check box.
e. Click OK.
Figure 1. The Edit Parameter Queue dialog

Step 5:
Click OK.
Note: The Queue parameter can only accept a user-configurable value (is only configurable at the company level). This is because you (the platform owner/administrator) cannot possibly know the specific queue names that are used by an individual company. It is therefore the responsibility of a company administrator with the Service Numbers:Modify privilege to define the queue to join. (The parameter is tied to the service numbers associated with it rather than the call flow.)
Step 6:
Click the Options selector.
Step 7:
Click the Caller priority selector.
Step 8:
For Caller priority, click on the L symbol next to the parameter and then select User-configurable. This allows a company administrator with the Service Numbers:Modify privilege to specify a different caller priority to suit their own requirements. (The parameters are tied to the service numbers associated with them rather than the call flow.)
Step 9:
Click Edit.The Edit Parameter Caller Priority dialog is displayed.
Step 10:
In the Edit Parameter Caller Priority dialog:
a. For Section, type in Join Sales Queue. This will be the title of the section under which the user-configurable parameters for this call flow will be displayed to a company administrator.
b. For Name, type in Caller Priority.
c. For Description, type in Calls in the Sales queue are high priority..
d. Tick the Required check box.
e. For Minimum Value, type in 1.
f. For Maximum Value, type in 1.
g. Click OK.
Figure 2. The Edit Parameter Caller Priority dialog

Step 11:
Click the B-Party Announcement selector.
Step 12:
For B-Party Announcement, click on the L symbol next to the parameter and then select User-configurable. This allows a company administrator with the Service Numbers:Modify privilege to specify a different audio file announcement to play to the agent when they answer the call. (The parameters are tied to the service numbers associated with them rather than the call flow.)
Step 13:
Click Edit.
The Edit Parameter B-Party Announcement dialog is displayed.
Step 14:
In the Edit Parameter B-Party Announcement dialog:
a. For Section, type in Join Sales Queue. This will be the title of the section under which the user-configurable parameters for this call flow will be displayed to a company administrator.
b. For Name, type in B-Party Announcement.
c. For Description, type in Whisper to Sales agent.
d. Tick the Required check box.
e. Click OK.
Figure 3. The Edit Parameter B-Party Announcement dialog

Step 15:
Click OK.
The Parameters pane for the Join Sales Queue node will look as follows:
Figure 4. The Parameters pane for the Join Sales Queue node

Step 16:
Configure the second Join Queue node in the call flow, but this time configure the node as follows:
| Parameter | Value | |
| Node name | Join Customer Services Queue | |
| Queue | Agent Queue For Customer Services | |
| Options | ||
| Caller Priority – user-configurable | Section – Join Customer Services Queue Name – Caller Priority Description – Calls in the Customer Services queue are second highest priority. Required – ticked Minimum Value – 2 Maximum Value – 2 | |
| B-Party Announcement – user-configurable | Section – Join Customer Services Queue Name – B-Party Announcement Description – Whisper to Customer Services agent. Required – ticked |
