Skip to content
  • Administrator Knowledge Base
  • Supervisor Knowledge Base
  • Agent Knowledge Base
  • Administrator Knowledge Base
  • Supervisor Knowledge Base
  • Agent Knowledge Base
Administrator Knowledge Base
Release Notes
Administrator Knowledge Base

Administrator Portal and Setup

  • Quick Setup Guide
  • Setup Guides and Templates
  • Privileges summary
  • Horizon Contact AWS migration guide
  • Administrator Portal Overview
  • Full Setup Guide
    • Setup 1: Setting up agents
    • Setup 2: Preparing assets
    • Setup 3: Assigning user groups
    • Setup 4: Creating queues
    • Setup 5: Multiple groups
    • Setup 6: Queue Numbers
    • Setup 7: Adding audio files
    • Setup 8: Customising queue recordings
    • Setup 9: Customising agent recordings
    • Setup 10: Queue KPIs
    • Setup 11: Advanced setup
    • Setup 12: Queue Announcements
    • Setup 13: Callback setup
    • Setup 14: Customising time ranges
  • Administrator Information
    • What I can see on my screen after I log in
    • Change password
    • Change Language
    • Searching a list
    • Searching a dropdown list of items
  • Contact Recording Guides
    • How call recording works
    • Introduction to Agent and Queue Call Recording
    • Introduction to Webchat Recording
    • Call recording scenarios

Staff Management

  • Status data report
  • Users
    • Resetting user passwords
    • Modifying an existing user account
    • Viewing agent contact details
    • Setting the IVR PIN
    • Configuring recording for a user
    • Viewing agent capability
  • Groups
    • User groups
    • Creating and adding a user group
    • Editing or deleting a user group
    • Copying a user group
  • Roles
    • Roles, privileges and profiles
    • Best practice when creating different versions of a role
    • Managing roles
    • Assigning and Customising Roles and Privileges
  • Break Reasons
    • Managing break reasons
    • Break reasons overview
  • Holiday Lists
    • Create a holiday list
    • Manage Holiday Lists
  • Time Ranges
    • Managing time ranges
    • Creating and adding a time range
    • Defining rules for a relative time range
    • Defining rules for an absolute time range
    • Editing or deleting a time range
    • Copying a time range
  • External Destinations
    • Managing external destinations
    • External destinations
    • Recording External Destination Calls

Calls Management

  • Simultaneous ringing overview
  • Scheduling a call
  • Direct calls overview
  • Call data reports
  • Call Flows
    • Call routing flows
    • Modify user-configurable parameters for call flows
    • Call Flow Tutorial
    • Setting up an auto attendant for BC/DR Treatments
    • Call Flow Templates
      • Call Flow Tips and Tricks
      • Call Flow Templates
      • Call Flow Template 1
      • Call Flow Template 2
      • Call Flow Template 3
      • Call Flow Template 4
  • Service Numbers
    • Managing service numbers
    • Update a service numbers call flow or user-configurable parameters
    • Update an existing service number
  • Campaigns
    • Viewing campaign progress
    • Importing lists of campaign numbers
    • Create an outbound campaign
    • Managing outbound campaigns
    • Managing campaign numbers
    • How do campaigns work?
  • Queues
    • Call queue introduction
    • Create a call queue
    • Managing call queues
    • Assigning agent groups to a call queue
    • Configuring agent outbound dialling
    • Configuring wrapup settings
    • Adding queue audio
    • Managing in-queue audio
    • Defining when in-queue announcements are played
    • Configuring opt in/out options for caller recording
    • Customising agent call recording buttons
    • Configuring call recording for queues
    • Defining call-queue KPIs
    • Configuring advanced settings for a call queue
    • Configuring callbacks for a queue
    • Configuring callback slots for a queue
  • Playbooks
    • Managing play books
  • Audio Files
    • Managing audio files
    • System audio files
    • Adding audio announcements
    • Text-to-speech overview
    • Uploading Audio Files
    • Generate text-to-speech audio
  • Area Codes
    • Create an area-code group
    • Managing an area-code group
    • Importing and exporting area-code numbers
  • Number Lists
    • Managing number lists
    • Importing number lists
  • Global Variables
    • Managing global variables
  • Surveys
    • Managing after-call surveys
    • How after-call surveys are handled
    • Configuring survey parameters
  • Call Slots
    • Managing call slots
    • Callback slot announcements
    • What are call slots?
    • What are callbacks?

Flow Management

  • Introduction to Routing Flows and the Flow Editor
  • Benefits of Routing flows
  • Managing Routing Flows
    • Introduction to Node types
    • Node Parameter Values
    • Create and publish a new routing flow
    • Making nodes available from the Node Type library
    • Configuring nodes in a routing flow
    • Configuring variables in a routing flow
    • Adding user-configurable values
    • User-configurable parameter options
    • Additional flow editor functionality
    • Managing existing routing flows
    • Importing or Exporting a routing flow
    • Routing Flow Templates
  • Standard Node Types
    • Caller interaction node types
    • Branching node types
    • Queue node types
    • Email node types
    • Company configuration node types
    • HTTP node types
    • External destination node types
    • Call delivery and routing node types
    • Outdial node types
    • Webchat node types
    • Miscellaneous node types

Webchat Management

  • Webchat overview
  • How the web-client interface works
  • Managing Webchat services
  • Webchat data reports
  • Classifying a webchat
  • Webchat Queues
    • Configuring advanced settings for a chat queue
    • Creating and managing a webchat queue
    • Defining chat-queue KPIs
    • Defining when in-queue announcements are displayed
    • Webchat queues overview
    • Assigning agent assets to a webchat queue
  • Webchat Flows
    • Managing Webchat flows
    • Modify user-configurable parameters for Webchat flows
    • Webchat flow templates
      • Chat flow templates
      • Chat Flow Template 1
      • Chat Flow Template 2
      • Chat Flow Template 3
      • Chat Flow Template 4

Email Management

  • Email overview
  • Email data reports
  • Supporting a shared email address
  • Settings required for adhoc outbound email
  • Classifying an email
  • Email Servers
    • Email Server recommended settings
    • Email Server Setup Guide
    • Viewing the default system email server
    • Viewing the email servers’ status
    • How email servers and authentication work
    • Managing email servers
    • Email Server Setup Guide
      • Email 1: Setting up users for email
      • Email 2: Setting up groups for email
      • Email 3: Creating text blocks for email
      • Email 4: Preparing assets for email
      • Email 5: Creating email classifications
      • Email 6: Creating email queues
      • Email 8: Email server settings
      • Email 7: Email Flow Templates
  • Email Flows
    • Managing email flows
    • Modify user-configurable parameters for email flows
    • Email Flow Templates
      • Email Flow Template 1
      • Email Flow Template 2
      • Email Flow Template 3
  • Email Queues
    • Email queues overview
    • Creating and managing an email queue
    • Defining email-queue KPIs
    • Configuring advanced settings for an email queue
    • Assigning agent assets to an email queue

SMS Management

  • SMS overview
  • Configuring SMS Templates
  • Configuring SMS From Addresses
  • Create an SMS queue
  • Configuring automated SMS
  • Managing SMS queues
  • Outbound SMS data reports

Safe-Pay Management

  • The cardholder’s view
  • How Safe-Pay works
  • Merchant Configuration
  • Configure Payment Queues
  • PSP Configuration
  • PSP – Link Delivery
  • Editing or deleting a payment queue
  • Configuring Safe-Pay
  • PSP – Additional Parameters
  • PSP – Advanced Limits
  • PSP – Digital Wallets for Stripe PSP Configuration
  • Safe-Pay data reports

Agent Assets Management

  • Agent scripts overview
  • Configuring agent scripts
  • Configuring agent script sections
  • Configuring text blocks
  • Managing text blocks
  • Managing attachments

Data Management

  • Reports
    • Introduction to Reports
    • Data Reports
      • Create and Export a Data Report
      • Edit Data Reports
      • Auto-generate Data Reports
      • Data Reports – Data Source and Aggregation options
      • Data Report Types
        • Call Data Reports
          • Service Number Report
          • Queue Report
          • Agent Report
          • IVR Report
          • Call Classifications Report
          • Call Transfers Report
          • Queue Transfers Report
          • Voicemail Report
          • Callers Report
          • Call Flow Report
          • Calls Report
          • External Destination Report
          • Scheduled Calls Report
          • Unreturned Missed Calls Report
          • Dropped Calls Report
          • Generate a Queue Abandoned Calls Report
          • Generate a Queue Service Level Report
          • Call Trace Reports
        • Status Data Reports
          • Working Hours Report
          • Break Reasons Report
        • Diagnostic Reports
          • Activity Audit Report
          • Status Change Report
        • Email Data Reports
          • Email Agent Report
          • Email Queue Report
          • Email Flow Report
          • Email Classifications Report
          • Inbound Emails Report
          • Outbound Email Agent Report
          • Outbound Email Template Report
          • Outbound Email Recipient Report
        • Webchat Data Reports
          • Webchat Queue Report
          • Webchat Flow Report
          • Webchat Agent Report
        • Outbound SMS Data Reports
          • Recipient Report
          • Outbound SMS Agent Report
          • Outbound SMS Template Report
        • Safe-Pay Data Reports
          • Contact Safe-Pay Payments Report
          • Contact Safe-Pay Agent Report
    • Contact Reports
      • Create and Export Contact Reports
      • Edit Contact Reports
      • Auto-generate Contact Reports
      • Contact Report Types
        • Survey data
        • Agent scripts data
  • Wallboards
    • Managing wallboards
    • Customising a wallboard
    • Wallboards overview
    • Filtering the Agents Overview widget
    • Filtering wallboard widgets
    • Filtering the call queues for Company Summary widgets
  • Classifications
    • Managing classifications
    • Classifications Overview

Customer-related tasks

  • CRM overview
  • Creating a new contact record
  • View a customer’s contact record
  • Modifying a customer’s details
  • Bulk Deletion of CRM Records
  • Deleting webchat conversations from customer contact records
  • Importing customer details
  • Exporting customer details
  • Configuring custom fields and tags
  • Assigning tags to a customer record
  • Managing columns

CRM Integration

  • Contact CRM Integration Developer Guide
  • Salesforce Integration
    • Introduction to Salesforce integration
    • Salesforce Integration procedure
  • CareConnect 2.0 Integration
    • Introducing CareConnect 2.0
    • Download CareConnect 2.0
  • Zendesk Integration
    • Zendesk Integration procedure
    • Using Contact with Zendesk
  • CareConnect Integration
    • Contact CareConnect Integration procedure
    • Using CareConnect
  • ConConnect Integration
    • Introduction to ConConnect
    • ConConnect Integration procedure
    • Configuring ConConnect
  • Microsoft Dynamics Integration
    • Introduction to Microsoft Dynamics Integration
    • Microsoft Dynamics integration procedure

System Management

  • Displaying the online help
  • Run Contact via Microsoft Edge
  • SFTP Destinations
    • Configuring an SFTP destination
  • Reporting destinations
    • Add Reporting Destinations
    • Managing Reporting Destinations
  • Themes
    • Managing system themes
  • Media Files
    • Managing media files
  • Agent Configuration
    • Configuring agents’ unavailability
    • Configuring what agents can view on their web portal
  • Email Editor Options
    • Configuring email editor options
  • Assets Configuration
    • Configuring system assets
  • Channel Configuration
    • Channel blending
    • Configuring system channels
    • Changing the blending formula of channels
    • Changing the importance weighting of a channel queue
    • Changing Agent Capacities
  • Organisation Configuration
    • Configuring ODS codes for automated NHSE reporting

Troubleshooting

  • How to prevent Contact users from going unavailable when the browser tab sleeps
  • Capturing intermittent faults using Bug Tracking
  • WebRTC Diagnostics Overview
  • Understanding WebRTC diagnostic tests
  • Home
  • Docs
  • Flow Management
  • Managing Routing Flows
  • Create and publish a new routing flow
View Categories

Create and publish a new routing flow

A routing flow defines how communications to a particular service in Contact are handled by the system. Routing flows can be defined for:

  • Calls
  • Emails
  • Webchats

Create a new routing flow #

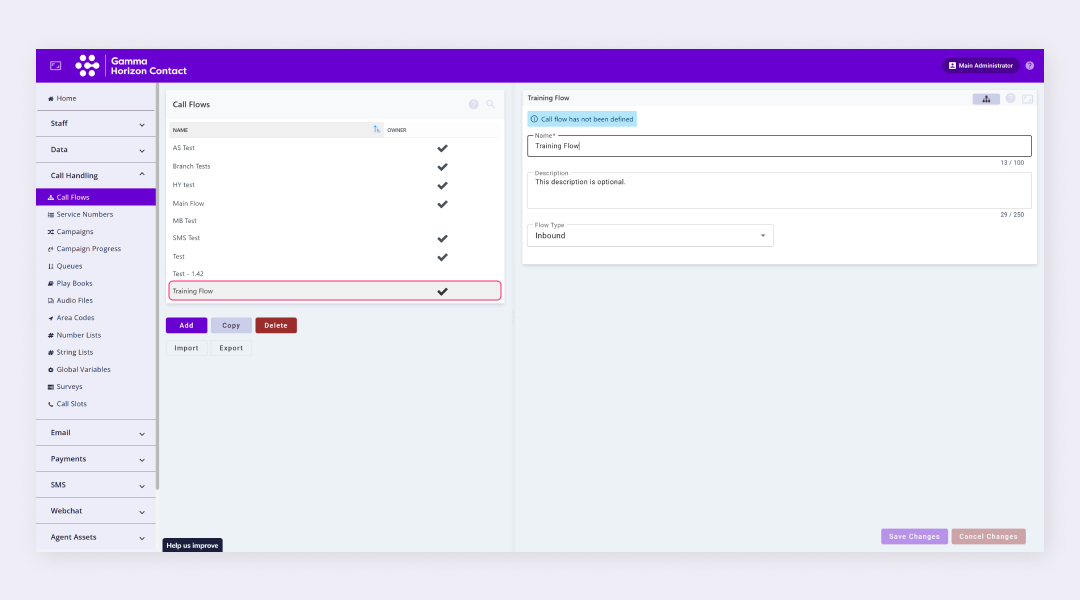
  • 1. Navigate to the relevant flow area and click Add
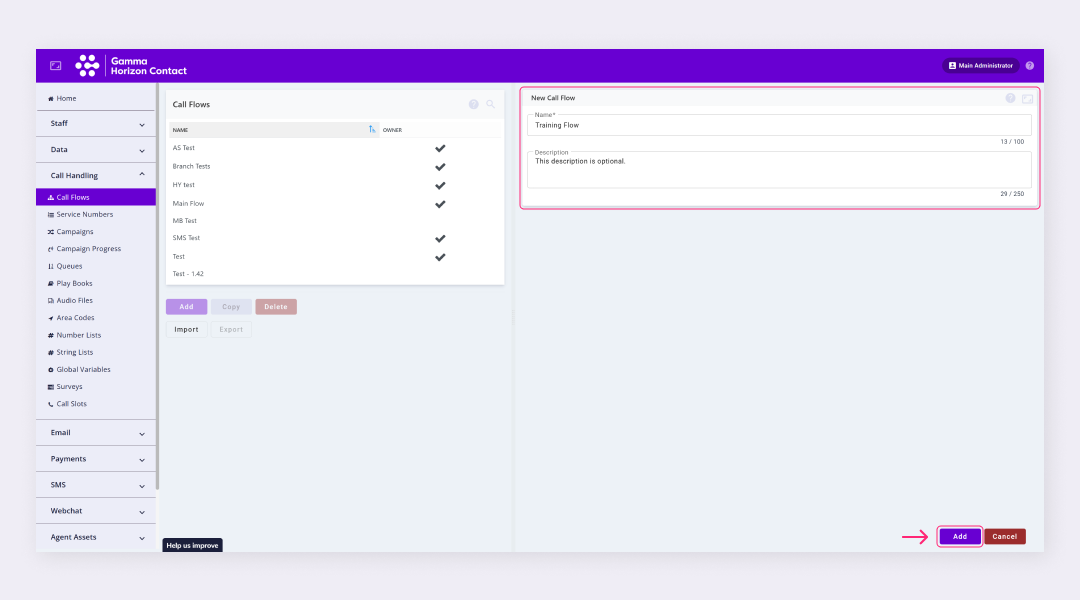
  • 2. Enter a name and description, then click Add
  • 3. The flow will be created
  1. Navigate to the relevant flow editor:
    • Call Handling → Call Flows
    • Email → Email Flows
    • Webchat → Webchat Flows
  2. Click Add and the new flow page is displayed
  3. (Mandatory) Enter the name of the new flow
  4. Enter a brief description if required
  5. Click Add
  6. The call flow will be created

At this stage, you will see a message saying the flow has not been defined. You will need to configure and publish the flow before it can be assigned to a service.

Note: You will need to define any assets such as hold music or queues that you want to use within the flow before configuring the flow via the flow editor.

Configure a routing flow #

See the below articles for help configuring a routing flow:

  • Configuring nodes in a routing flow
  • Configuring variables in a routing flow

Publish a routing flow #

Once a routing flow has been configured it needs to be validated and published. The validation process generally takes place quickly and the results will be displayed in the Flow Editor’s Validation Result window.

A routing flow is deployed in Java ARchive (JAR) format. If validation succeeds, the routing flow is converted to a JAR file ready to be published.

  • 1. After configuring or editing a flow click the Validate and publish icon
  • 2. Review the Validation result and if there are no errors click Publish
  1. In the flow editor click the Validate and publish icon
  2. Review any errors and resolve if necessary
  3. Click Publish
  4. The flow will be published and ready to be assigned to a service

If there are any errors the validation will fail and you will need to resolve the errors before the routing flow can be published. A description of the error will be displayed in the Validation Result window.

How did you find this training?
Node Parameter ValuesMaking nodes available from the Node Type library
Table of Contents
  • Create a new routing flow
  • Configure a routing flow
  • Publish a routing flow

End User License Agreement